Friday, November 29, 2013

Baby's First Christmas

Good morning everyone!

My ornament today is made with Gecko Galz papers and image
and is being featured on the Gecko Galz site.

My son & daughter-in-law are expecting a son,
SOON,
so my ornament is for my new Grandson's First Christmas...


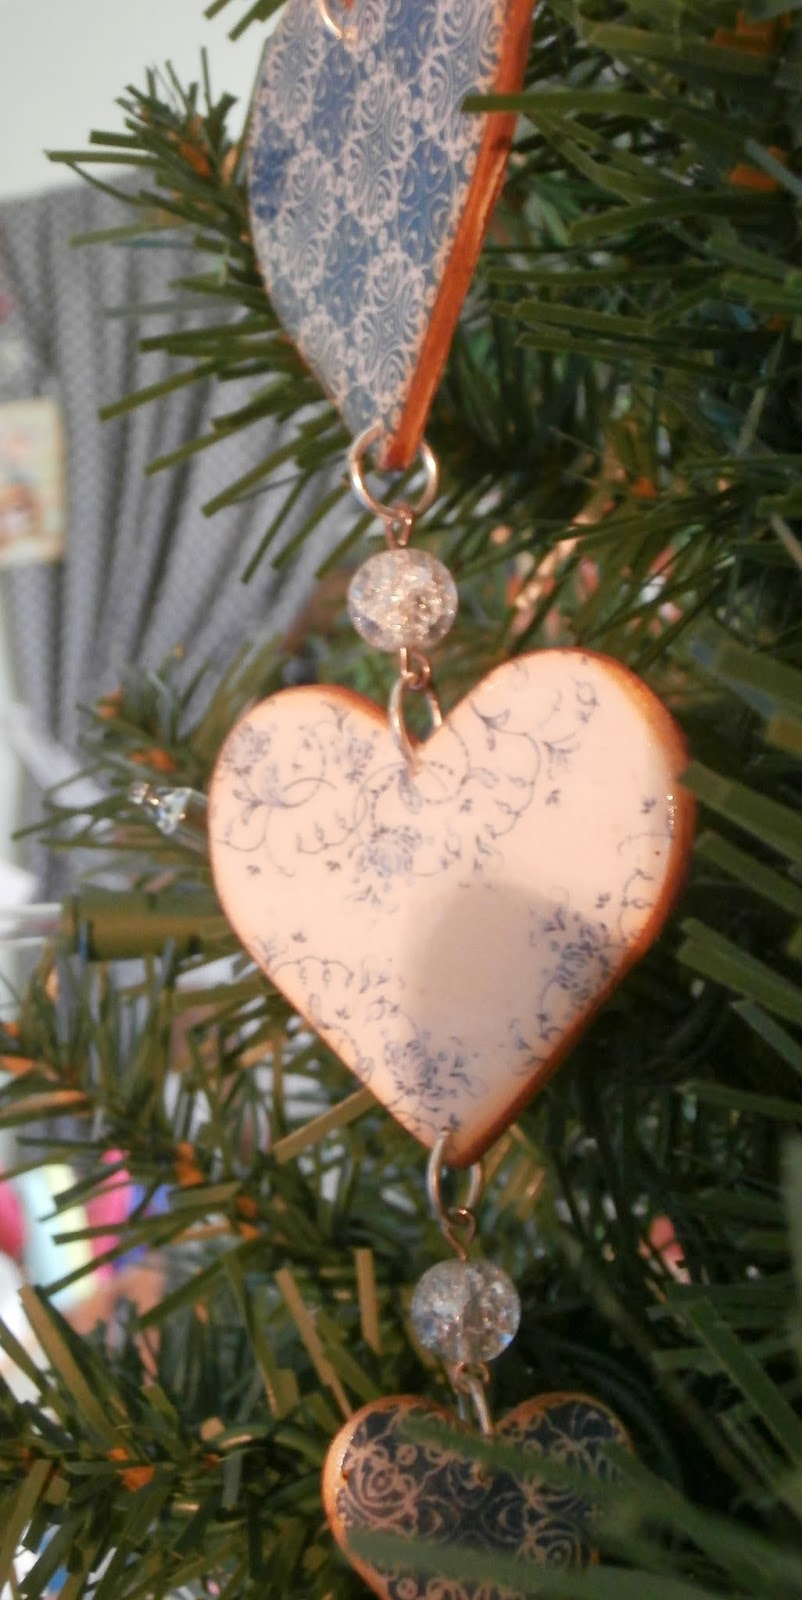
I started with 3 wooden heart shapes.
I added a couple of pieces of paper (with mod podge) 
from the Blue Willow paper pkg, 
from Gecko Galz,
due out in a couple of days, 
in December!

I added some vintage photo distress ink to all the heart edges as well as all the papers, sentiment pieces, and image.

I used Crackle Accents to the top of all the hearts.

A close-up of the first heart.....


I used Glossy accents to add the sentiment pieces and the image 
then topped them with the Glossy Accents as well!


How cute is this little angel?
I found this cutie on the Christmas Children collage sheet at Gecko Galz and had to fussy cut him and add him to my ornament.
What better picture for a new baby's ornament!


I love the look from the Crackle Accents!


Above you can see that I drilled holes in the hearts 
(or "hearts" and flowers...I'll show you the flowers later)
 with my handy dandy Dremel so I could add
 jump rings and a glass beads to connect the hearts.

Below is a look at the back....


You can see the vintage photo distress ink and I simply added some Glossy Accents to the back.

I added a piece of baby blue ribbon from my stash to hang it on the tree!

If you haven't yet,
please pop over to Gecko Galz 
and check out more of the ornaments that the rest of the Design Team has created!

Hope you had a wonderful Thanksgiving 
and 
have a great Holiday season!


Monday, November 25, 2013

Oh Christmas Tree...

Good morning everyone!

Today's ornament is a Christmas tree.


This is the last shape I used for my ornament sheet I made in Gimp.
This has the same music note image from Graphics Fairy.


I used a trim for the garland and
 Rouge liquid pearls & Platinum stickles for the ornaments/lights.
I also used the Platinum stickles around the black cardstock that I fussy cut around the tree for a mat.
The sentiment I printed on my computer.

Below you can see that I twisted my jewelry wire around a dowel.
On the first photo above you can see that the jewelry wire ended up looking like one of the larger Christmas tree light bulbs.
 That was one of those happy accidents! 
LOL


Thanks for stopping by!

Have a great week!

Saturday, November 23, 2013

Silver Bells Ornament

Good morning friends!

Today I have another ornament to show you.

This was one of the new ornaments I designed in Gimp.


The background music note image is from Graphics Fairy.

I added vintage photo distress ink on the bell and sentiment piece.

I added the little May Arts leaves and a little rose on top of a bit of lace
then mounted the bell on top of a piece of red cardstock.
I fussy cut the mat around the bell and leaves.


Above you can see the sentiment piece that I mounted the same way I did the bell.
You can also see that I added a bit of Pearl Paint Dabber around the edges of everything including the piece of stem that I twisted.

Below is a close up of the rose leaf cluster.
I sprayed the rose with perfect pearl mist for a bit of sparkle.


I used a piece of Christmas Twine to hang the ornament.

My tree is going to look so good with all these handmade ornaments!
I'm having a lot of fun making them.
I hope you are having fun making your Christmas decorations!

Thanks for stopping by!
Happy Scrappy Dayz!

Thursday, November 21, 2013

Christmas stocking card

Good morning everyone!

Today I have a Christmas card to show you.

I started out with one of my stocking ornaments I designed in Gimp.
Once I had it decorated I decided to put it on a card instead of making an ornament out of it.


I used a blank card and topped it with a piece of patterned paper from the
 Grandma's House paper pkg from Gecko Galz.

I used my Martha Stewart punch on a scrap strip of paper then topped that with an image from Graphics Fairy.
The music note image on my stocking is also from Graphics Fairy.

I distressed all the edges of the papers and stocking then added vintage photo distress ink.


I used Rouge liquid pearls on the stocking toe & heel then decided it need more so I added some Burgundy stickles.

To go with the burgundy I added a piece of velvet trim to the top.

Added a bow I made with sheer ribbon from my stash.


I finished off the card with a few more bits of liquid pearls on the corners of the cards.

*****
I promise I did clean the dust from my cd player after taking this last shot! 
I found my desktop too!
LOL

Happy Scrappy Dayz!


Tuesday, November 19, 2013

Christmas Mitten Ornament.....

Good morning friends!

I'm playing with my mitten ornament again.
If you haven't seen the first one you can see it here.

Today I added a Gecko Galz image from Novembers 
Frosty collage set.


I got out my Art Glitters again for this one.
I used (305) Goldenrod, Ultrafine Transparent, around the "Merry Christmas" pieces & the edges of the mitten 
and 
(337) Challis, Ultrafine Opaque Hologram, around the edges of the "Frosty" image that I used my stub Crop-a-dile punch on.

Below you can see a close up of the glitter as well as the adorable little snowman image from Gecko Galz!


Below you can see my pompom trim that I added around the top of the mitten.
I also added a some velvet trim on top of the pompom trim.
Also in the close up you can see my rosebuds and bow cluster.

I sprayed the rosebuds with Bed of Roses Spritz from Shimmerz.

I added (142) Coral Reef Ultrafine Opaque Glitter from Art Glitter to the rosebuds.
I love the shine that the Art Glitter adds!

On top of my Christmas Twine bow is a pearl button. 
(the Christmas twine is from Really Reasonable Ribbon)

I twisted the ends of my jewelry wire hanger and the rose bud stems with the end of a paint brush.


Below is a peek at the back. 
I added the same glitter around the edges as I did in the front 
and the same trims and twine bow on top.


I will be linking up at 
Gecko Galz Yahoo Group's Holiday Prep Challenge

Thanks for stopping by.
Have a great day!


Sunday, November 17, 2013

Merry Christmas Mitten ornament.....

Happy Sunday everyone!

Today I want to show you an ornament I made. 


I started with the mitten & heart shapes from  
 Heather, my BOLB (Best OnLine Buddy).
It is part of her Shabby Vintage Ivory Christmas Ornament collage sheet.

I went into GIMP and changed the background to a handwritten image I found at Graphic's Fairy 
then added a pine tree,
 also from Graphics Fairy,
to the heart shape. 

The "Merry Christmas" I printed out from my computer.

I added a bit of glitter (313 Bayou) Ultrafine Transparent glitter from Art Glitter to the edges of my mitten and on the tree. 
Platinum Stickles was used on the edges of the Merry Christmas pieces.
Rouge Liquid Pearls was used to add the red dots along the edge of the heart.


What is Christmas decor without a little garland?
I added a bit of red garland across the top, where I had put a little bit of lace trim.
I added a medal butterfly that I painted with a little watered down gesso, 
then I rubbed off a bit of the gesso to let the medal poke through 
& added a little platinum stickles for the body.


A little bit of jewelry wire was added for the hanger.

Below is a look at the back side. 
I left it empty so you could see the image I used,
I may add more to it later.


I linked this up with 


Thanks for stopping by.
Hope you have a great week!


Friday, November 15, 2013

Treasured Times Challenge #6

Good morning everyone!

It's time for a new challenge over at 

The rules for this challenge is to use 
non-traditional Christmas colors.

I chose to go with teals.....


The adorable stamp is
So cute!


I colored her with my Spectrum Noir markers.
Then added a bunch of glittery snowflakes.
I also glittered her snowy face and body.


I added aquamarine crystal glitter,
 from Martha Stewart,
around the background circle on the front and the sentiment piece on the inside.


I made the bow with some wrinkled seam binding from my stash.


I hope to see you join us in our challenge,
I look forward to seeing your choice of non-traditional Christmas colors!

Thanks for stopping by!

Happy Crafting!


Tuesday, November 12, 2013

Christmas card & tag - pretty in blues...

Good morning everyone!

Today I am showing you the last of my Christmas cards and tags that I made for my granddaughters.

As with all the cards and tags I went with the challenge rules over at 

Use 4 shades of the same color,
bling and a stamp! 

If you've seen the others then you know that all the cards have basically the same look but the tags are a little bit different. 

I love the blues I used to color this one! 


I added blue gel pen doodling to the edges and blue trim tucked under the one side.


Below you can see the texture of the Snow Writer on the snowman,
the white flocking on her dress 
and the gem/coal eyes.


Below is the matching tag.....


The 25 ticket is from Gecko Galz...
Altered Christmas collage collection.

The little blue flower is dimentional sticker,
I tucked a couple of leaves underneath.

I cut little strips of lace trim and added a some ribbon and trim to the edge.

***
There are only 2 days left to join us in the challenge over at Treasured Times so hurry along and join the fun!

Saturday, November 9, 2013

Christmas card & tag- gone green.....

Good morning everyone!

Here I am again with another card & tag set for my granddaughters, 
using Suzie & Snowman stamp designed by Erica Nicomedi

Today's color - greens


I sprayed the lace ribbon with a couple different greens sprays.
I used a little scrap of the lace on the ribbon & red garland piece I added.

I have to say I had a lot of fun adding the white flocking to Suzies outfit on all the cards and tags...
love that fuzzy feel! 

And the texture of the Snow Writer for the snowman is pretty cool too!


Below you can see the texture on the snowman and his bling/coal eyes!


Below is the matching tag...


The Christmas ticket is from 
Gecko Galz...Altered Christmas collage collection.

The ribbon is sprayed with several red sprays.
And a couple of pearls for added touch.

Thanks for stopping by!

Don't forget to stop by Treasured Times and join our challenge
you have 5 more days, 
challenge ends Nov 14th at 11:55 pm pst.

***
I'm linking up to
Crafty Calender Challenge...All things Christmas
Sweet Stampin' Challenge...Christmas is coming!


Thursday, November 7, 2013

Tis the Season...

Good morning!

Stepping outside of the Christmas color box 
I decide to make this card...

in Yellow!


I started with the image from the Frosty collage collection at Gecko Galz
added the Curly Locks paper from the Miss Muffet paper collection.


The yellow in the image went so perfectly with the Curly Locks paper.

I added the black polka dot paper & yellow strip from my stash.

I added platinum stickles to the edges of all the edges.

The swirl grunge board piece was already colored with silver distress stain,
I tucked it under the image that was pop dotted on top.


I added the "Tis the Season" stamp in black soot distress ink.

I will be linking this card to...
Sugar Creek Hollow - Anything Goes challenge

Thanks for stopping by!


Wednesday, November 6, 2013

Christmas card & Tag.....

Good morning! 

Today I want to show you another one of my card & tags that I made for my granddaughters.

Once again I used the challenge guidelines from 

Use 4 shades of one color, 
bling and a stamp

Here is my card, 
this time I used purples for my purple loving granddaughter, 
colored with Spectrum Noir markers.


Below you can see the Snow Writer texture on the snowman and his, bling, eyes of "coal"


White flocking for her hat and dress.....


The trim around the edge is from my stash.

Below is the matching tag I made.....


I used the same purple coloring, gel pens for the holly & berries, also her belt buckle.
The lace trim, from my stash, was sprayed with Crushed Grape Dylusions ink spray and a few added bling.

Hope to see your posts in our challenge over at Treasured Times!

Happy Crafting!


Monday, November 4, 2013

Kissing Snow Couple ATC

Good morning everybody!

I hope you all had a great weekend!

I have been sick for the last couple of weeks so I haven't been very creative but in the last couple of days I have been happy to be able to play! 

I started with this ATC.....


If it could have, this ATC would have made itself!
Everything just seemed to fall into place on it's own!

The background paper "Hey Diddle Diddle" is from Miss Muffets paper pkg.
The Kissing Snow Couple were from the Frosty collage collection.
Both are from Gecko Galz.

I had no real plan to start off with...
while cutting the paper I realized one of the pieces was the right size for an ATC.

Looking around my desk, at all the Frost collage images, I spotted this one and thought it matched pretty well. 

Off to look through my stash I found the skeleton leaf that was already sprayed  with 
Adorondack's Cranberry color wash.
A piece of ribbon, a little diamond trim, some clear mini beads
 and a poinsettia that I sprayed with 
Cotton Candy Spritz from Shimmerz Paints.

I put the image on pop dots so I could tuck the blue diamond trim under at the bottom.


Here's a couple of close ups of the mini beads and the cute kissing couple!


I am linking this up to these challenges...

Sugar Creek Hollow...Anything Goes

Thanks for stopping by!
Have a great week!

Sunday, November 3, 2013

Christmas tag...

Good morning everyone! 

A couple of days ago I posted a card that I made for the 
Treasured Times Rubber Stamping & Scrapbooking challenge.

Since I thought the stamp was so cute I decided to make several cards and matching tags for my 4 granddaughters for Christmas.
I used their favorite colors when I put them together.

Today I want to show you the matching tag to the card I posted earlier.


Suzie & Snowman was designed by Erica Nicomedi

I sprayed the lace trim with a couple of different green sprays.
The Christmas tickets on the top right of the tag are from 
Gecko Galz Altered Christmas collage set.
I topped that with a little rose.

I used a couple pieces of scrap ribbon to tuck under the stamped sheet.
The twine is from Really Reasonable Ribbon.

I added vintage photo distress ink all over. 
Textured the snowman with Snow Writer from DecoArt.
Used white flocking for her hat, collar and dress.
Gel pens for the holly & berries and her belt buckle gave it a bit of shine and embossing.

Friday, November 1, 2013

Treasured Times Challenge #5

Good morning everyone!

Today is the beginning of a new challenge over at 

You must use 4 shades of one color,
add some bling
and don't forget a stamp...we are a stampers after all.
You can use one of our stamps, designed by one of our many wonderfully talented stamp designers,
however if you don't have one of our stamps you can use one of your own!

The challenge runs from Nov 1st 8am pst - Nov 14th 11:55pm pst.

Here is my sample for this challenge.....


This gorgeous little stamp is called 
 designed by Erica Nicomedi.
Isn't she adorable?

I used several shades of reds & pinks, 
coloring with my Spectrum Noir markers


Above you can see the bling I used are a couple of black gems for the snowmans eye's made out of "coal"!

For texture on the snowman I used Snow Writer by DecoArt.

I added white flocking to Suzie's hat, collar and dress.

Gel-embossing pens give her holly & berries as well as her belt buckle a little shine and texture.


I added a bit of gold garland along the one side of the card and tucked a couple pieces of scrap ribbon on top of that.

In the mood for a little doodling so I went all around the edge of the stamped piece then topped that with a little vintage photo distress ink.

I hope you will all come and join us in this challenge.

I'm linking this card to .....
Card Crafters - Cute Cards challenge

Happy Scrappy Dayz!