Thursday, June 20, 2013

United We Stand wall hanging...

Hi everyone!

Today I wanted to pop in with another piece I made for the 

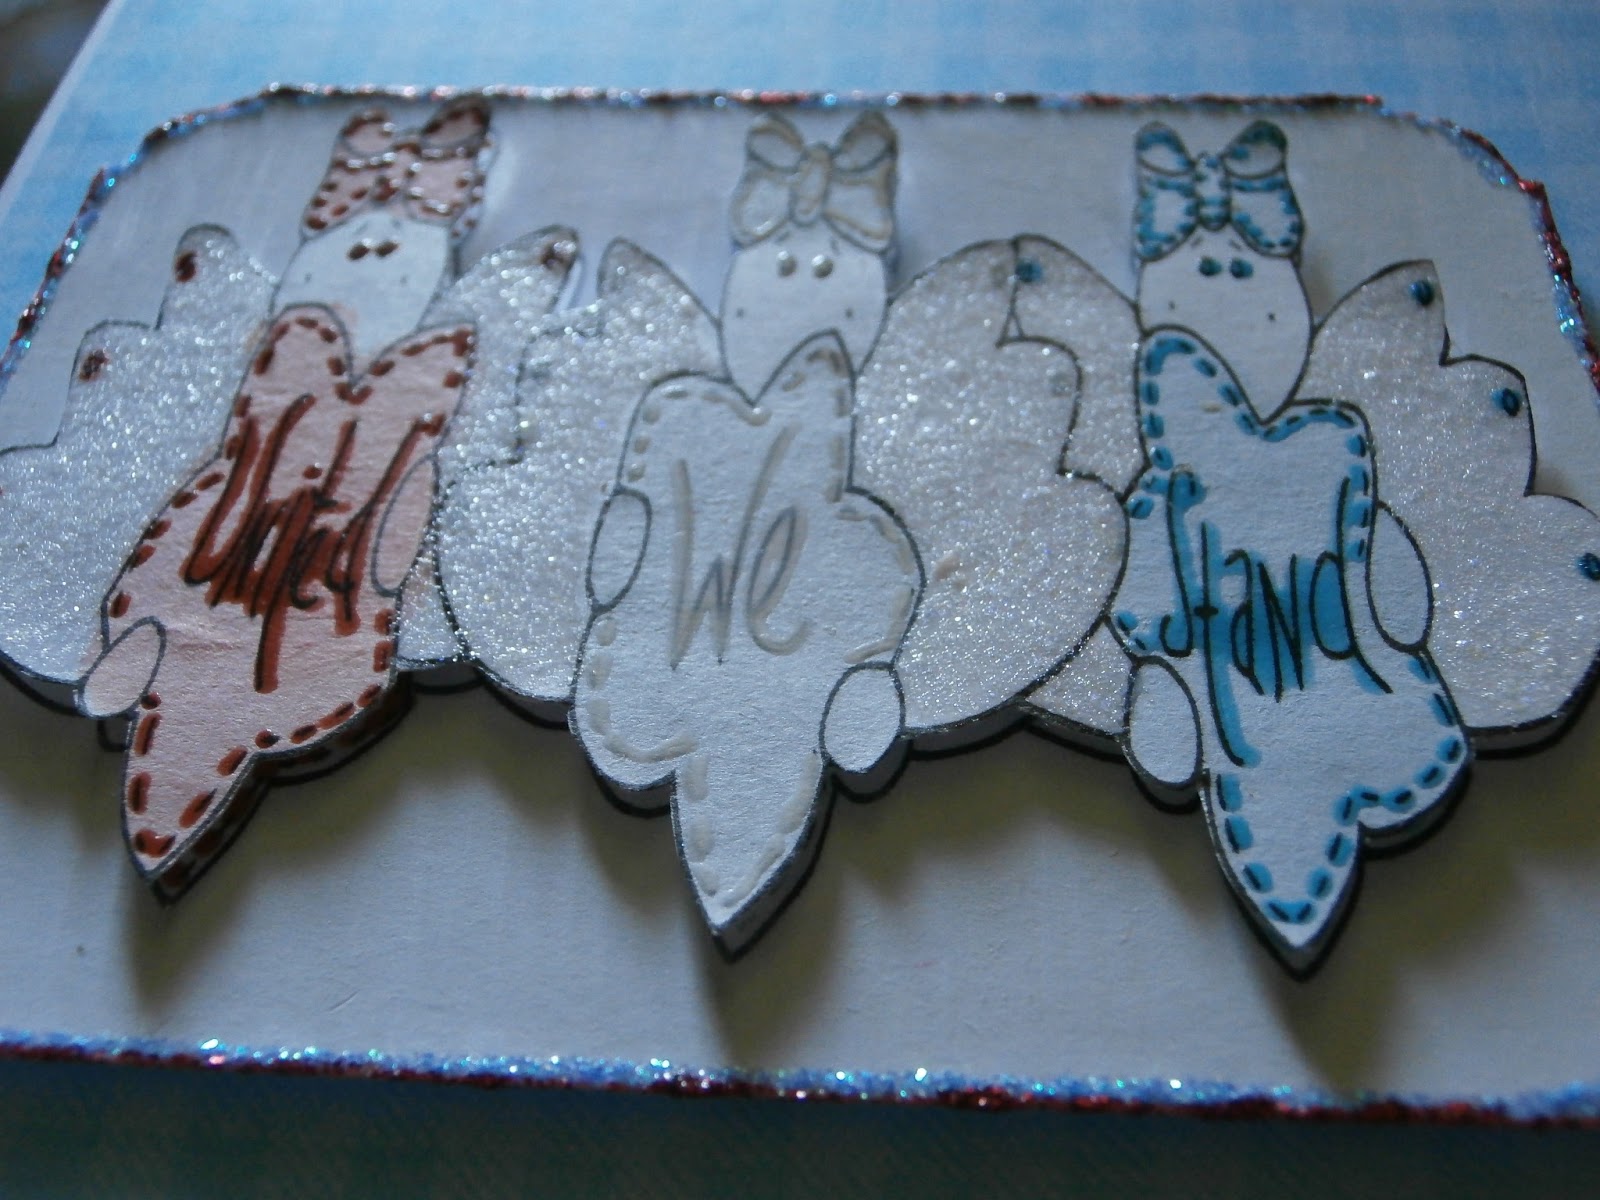
I once again am using the stamp designed by 
Karen Strubel titled United We Stand.

I was in the mood to play with cardboard
(since I have a pile of it here in my room)
so I made a wall hanging.....


I tore the top layer of paper off the cardboard then painted it with gesso.

I ran a bunch of glue in streaks all over, 
then added some blue glitter
(Dreams from Art Glitter).

In between all the sparkling blue streaks I added more glue streaks and topped that with Coral Reef Glitter also from Art Glitter.

I printed two of the stamps, 
colored them with my spectrum noir markers, 
then I fussy cut the center star out so I could pop dot it on top of the other.

I added a bit of yellow glitter glue (dollar bin) to the wings.

The challenge requirements are the use of buttons & ribbon 
and 
the colors red, white, blue

I stacked a red, a white and a blue button on top of each other 
then put them on top of a little bit of silver ribbon that I curled with my scissors.

I finished it off with a couple of brads that I strung a bit of colored wire into to hang it.


Above you can see my stacked buttons and ribbon.

Below is a close up of the glitter streaks and glittery wings.


We'd love to see you enter the challenge,
everyone is welcome to join in!

And don't forget.....
Jody has a mystery prize for the winner!
Photobucket

Thursday, June 13, 2013

Our first challenge!!!

Good afternoon everyone!

We are excited over at 
We have posted our first challenge!

For this challenge you can make any project.
 You must use...
Ribbon, buttons and the colors red white & blue

Being on the DT I am also required to use this cute stamp designed by Karen Strubel
(you can find the stamp here if you would like to use it as well)

The card I created.....


Told you this stamp was cute!

I got out my red, white & blue gel pens for this stamp.
I wanted to highlight the stitching around the stars and the ribbon on their heads.
I also used them on their eyes and the dots on their wings.

The pens give it a bit of an embossed look.
You can see a little bit of that in the picture below.....


To tint the stars & bows I used 
faded jeans, fired brick and weathered wood distress inks that I tamped on my craft mat, 
added some water to and painted on.

Then I used some shimmery Hampton Art glitter glue from Michaels $1 bin for their wings.


I also added some blue and red glitter glue to the edges of the stamped paper.

I pop dotted the stamp that I fussy cut.

Wrapped a piece of ribbon around my patterned paper, tied a bow and topped it with my blue button that I threaded a bit of red & white twine through.

Another look at my finished card.....


***********

I hope you will join us,
add your red, white & blue project with ribbon and buttons,
to our challenge!

Anyone can enter!
Click here to see the details and to post your entry!

Oh there is a mystery prize for the winner!
(can't wait to see what that is) 


Photobucket

Wednesday, June 12, 2013

Thank You...

Good morning everyone! 

Today I have a Thank You card to show you.

My BOLB...Best Online Buddy...Heather
recently sent me a wonderfully sparkling birthday gift.....

Lots of glitter! Yay!

As soon as I got it I had to play and what better to start with than a Thank You card for her?

So here it is.....


I started with a card blank,
distressed the edges, 
added a bit of vintage photo distress ink, 
and 
folded the cover on an angle.

I took a piece of paper from the Dapper Dan collection at Gecko Galz.
The paper I chose is called At the Station.

I got out one of my damask masks and added some 
Dazzelerz in Tutti Frutti from Shimmerz Paints...
love the shine on it!

On top of that I started layering...
cheese cloth...sprayed with 
Cotton Candy & Treasured Hymn Spritz...also from Shimmerz Paints,
lace trim...from my stash,
and
floral image is from Gecko Galz Springtime collage set.

I used pop dots for the floral image.

The sentiment was stamped on a die cut  that I cut in half.

All the elements edges are distressed and inked with vintage photo distress ink.

Below you can see the card open.....


I love how it opens with the fold.

I used another flower,
 that I fussy cut,
 from another floral image on the Springtime collage set.
And it is pop dotted on another piece of At the Station paper.

The picture below shows where my glittery fun happened.....


I love this image alone but when I added the glitter I liked it even better!
So much fun!
(I glittered the little rose on the inside of the card as well)

The glitters I used were.....
Coral Reef for the roses,
Dreams for the little blue flowers,
Bayou & Lettuce for the leaves.
All these are Ultrafine Transparent glitter from Art Glitter.

*****
Thank again BOLB!!!

Photobucket

Monday, June 10, 2013

Moments...

Good morning everyone!

Today I wanted to show you a quick little mini I made.

It's a pretty simple design with little embellishing.

My idea was for this to be more of a journal than a photo mini.


The covers were done with a blank sheet of cardstock that I mod podged onto the cover of the paper pkg then I used a mask and some 
Shimmerz Paints Dazzelerz in Tutti Fruitti...love the shimmer!

I added some lace, that I sprayed with 
Lindy's stamp gang Cosmopolitan Pink spray.

The large flower I made with a few of the scrap pieces of the paper line I used in the rest of the mini.
(I used an old My Minds Eye paper pkg, given to me a while ago...don't remember the name)
The other flowers are from my stash. 


The mesh ribbon behind the title is from Really Reasonable Ribbon...
I cut it with my tattered florals die when I cut my other flower pieces.


The inside pages are all pockets and envelopes 
(going with the journal idea),
 giving me enough places to tuck my thoughts inside.


I used my Bind-it-all for the binding.

*****


Photobucket

Friday, June 7, 2013

4th of July ATC...

Good morning everyone!

I have another ATC to show you today.....


This one was really simple!

I grabbed my scrap box and found the polka dot paper and the blue textured paper.
Then I grabbed this wonderful 4th of July image from 
Gecko Galz Red White & Blue collage sheet, new this month.

I distressed the edges of the background paper and the image then added some fired brick distress ink.

I tore the textured paper and added some red perfect pearls and some white puff paint. 

Layered them all together and I was done!
Easy Peasy!
Photobucket

Wednesday, June 5, 2013

A ray of sunshine...

Hi everyone!

I have a card to show you tonight that I made for a DT project at

I just received this stamp today,
designed by Christy Hartman
and couldn't wait to play with it!

Between cleaning, shopping, chauffeuring and everything else I did today I somehow managed to play! 


How cute is this little guy?

I colored him with my Spectrum Noir markers, 
then added some waterfall stickles to the splashes, his hat and around the edges of the image border.


I love the look of the sparkle on the droplets, of course they look better in person!

I used my deco crop-a-dile corner chomper on all the corners.

I also added the stickles around the edges of the sentiment piece below.


Love this little cutie and I'm looking forward to more designs by Christy!

Photobucket

Beauties and a Butterfly...

Good morning friends!

I have decided to change things up a bit and made an ATC to show you today!

I don't normally make these but I have to say it was fun and I love how this one came out!


I started with Charlston.....a patterned paper from the 
Gatsby collection at Gecko Galz.
Another new paper collection to love!

Also new from Gecko Galz this month is 
The Cats Meow collage sheet, 
where I got my gorgeous gals images.

The lacy bit to the left is a sticker I've had in my stash for a while. 

I used, my favorite, platinum stickles to the edges of the images and the oval punch.

The oval was punched from a piece of paper in my scrap box...
I believe it is a Graphic45 paper but I'm not positive on the collection.
(I want to say Secret Garden but it could also be from A Ladies Diary)

I fussy cut the butterfly from 
Aprils-Butterfly Wings collage set, at Gecko Galz,
 and put it on my oval piece.

I punched a couple of little holes on each end of the oval punch to add my grey twine,
 I got from Really Reasonable Ribbon
putting a bow on each side.

And last but not least I added a couple of Candi pieces on the two opposite corners. 
I think these are perfect for ATC's!
They give you the brad look without the brad prongs poking through the back of the ATC!

Photobucket

Sunday, June 2, 2013

Feathered card.....

Good morning everyone!

Sorry I seem to be leaving a lot of space in between posts these days!
I'm going to blame it on the weather and the fact that my mojo has apparently left for a sunnier place to play!

Even mojo-less I did manage to make a card though!

The card I want to show you today is a simple one, but pretty.


I so love being on the DT at Gecko Galz!

My card started with a patterned paper from another fabulous collection LeeAnne has, new, for us all this month!
The collection is Gatsby and the paper I chose for this card is called Daisy.
I thought the paper went well with the image from The Cats Meow collage sheet, also new this month!

I used pop dots behind my image so I could tuck the feather underneath. 

I also folded a flower and tucked that behind the image a bit and topped it with several other flowers that matched the colors of the paper and image really well!
That was a lucky & happy coincidence! 
Love it when things just fall into place like that!

Hope everyone is enjoying warm sunny weather where ever you are! 

Photobucket