Friday, January 25, 2013

Shabby little card.....

Good afternoon everyone!

I haven't been in much of a crafty mood lately but last night I decided to give 

I used the
Embossing, Ribbon & Distressing...


I used my Cuttlebug Birds & Swirls embossing folder, for the embossing.

I distressed all the edges with my Tim Holtz distresser.

The rose piece that I pop dotted onto the card is from my BOLB(Best OnLine Buddy) Heather.
 It's part of her 
Shabby Pink Birthday/Thank You Card Notes collage sheet 
over at her Etsy.
She has several Shabby/Vintage collage sheets that she has done, for sale, so make sure you check that out!

The ribbon and pearl trim are from my stash.

The piece under the pearls looks like ribbon but it is actually a really cool paper that I have had in my stash for a while.


The inside I added the same pink paper I layered on the front
and added another Shabby collage piece on top of a small piece of the shimmery cool paper.


This last picture you can see that the embossed paper has a shine to it.

I will also be linking this to 
Shabby Tea Rooms Just Pretty challenge.
The challenge was to use pink and white,
stripes (ribbon) and a flower.

Hope you all have a great weekend!

Photobucket

Thursday, January 17, 2013

Owl Always Love you...

Hi everyone! 

Over at Gecko Galz we are showcasing a Valentines Day card every day that one of the DT has done!

With every card we will tell you how we made them and there will be a product that you can save on!

 There is also a weekly giveaway for a lucky Gecko Galz customer!
WOOHOO...
Could that be you?
I think it can!

At the end of the 30 days of Valentine's Day Cards (on Feb 14th) you get to vote for your favorite!
This will be quite a challenge, we have a bunch of talented ladies making cards for your inspiration!

The fun started yesterday with Starr's card and it's a beauty!!!
If you missed it you can still see it over at Gecko Galz, just click on the link for the Valentines Cards and check out the card of the day then scroll down and press on the heart with,
 one of my mom's favorite flowers, 
Lily of the Valley, on it.

Today is my day and here is my card.....


The owl stamp and the background paper it is on are 
January's freebies from Gecko Galz..
I cleaned the background off of the digi stamp and printed it onto the paper.
 
The patterned paper behind it is also a Gecko Galz paper,
from the Star Crossed paper pkg.

I roughed the edges of the papers before layering them on the blank card.

The "brads" on the bottom are not brads, they are CANDi. 
I found them at Scrapbook.com.
Love that they give you the look of a brad without having to poke a hole in your card! 

The ribbon is from Really Reasonable Ribbon .


Can't wait to see tomorrow's Valentine's Day Card!
We have such an incredibly talented DT!

Don't forget to go over to 
and vote for your favorite 
Valentine's Day card on Feb 14th!


Photobucket

Wednesday, January 16, 2013

Tim Holtz 12 tags of 2013

Hello everyone!

Today I'm going to show you the Tim inspired tag I made last week and keep forgetting to post! 
LOL


I used Cuttlebug's Perfectly Paisley embossing folder.

I used wild honey, worn lipstick and broken china distress inks on the tag and a little walnut stain distress ink on the edges.

Instead of water, like Tim did, I sprayed my tag with perfect copper perfect pearls mist.
Love that shimmer!


I chose the harlequin swirls grunge board that I had on hand.
I added brushed pewter distress stain to it then sanded some of it off and used what ever ink was on my blending tool to go over it.


The sentiment piece was one I had laying around here and since it talks about a New Day, and it's New Years, I thought it would be perfect.

*****
Don't forget to stop by Gecko Galz today 
and everyday
 for the next month to see the Valentine Cards we will be showing you for inspiration.
There are product specials with each card, 
a prize each week for one lucky customer
and
at the end of the month of cards (Feb 14th) you get to vote on the cards we've showed you.

The first card is from Starr Timmons,
don't miss it,
it's really pretty!


Photobucket

Saturday, January 12, 2013

Heartfelt Thanks...

Hi everyone!

I hope all is well!

Today I want to show you the card I made for my dear neighbor...


The challenge over at 
Sugar Creek Hollow is Winter White,
so I decided to give it a go with this card.

I started with Snow Flurries texture fade by Tim Holtz.


I roughed up the edges with my Tim Holtz distresser, 
then added some Pearl paint dabber to the snowflakes as well as around the outer edge of the card blank and on the center diecut (Silhouette Cameo) pieces.


I sprayed some Perfect Pearl Mist on the flowers to give them shimmer.

I hot glued some white pompom trim to the back of the textured diecut
and stamped my sentiment on the smaller diecut with Weathered Wood distress ink. 

In the above picture you might be able to see that I added a piece of lace trim topped with a piece of sparkly rickrack underneath the pop dotted diecuts.


And why am I giving my neighbor a Thank You card?

 She was there for me,
kind enough to drop everything and drive me to the ER 
when I cut half my nail,
 and maybe a layer or two of the skin below it, 
off my thumb.


This beautiful blue beauty will be on my finger for at least a week, 
at which point I can remove it to take a look.
If all looks right (no infections), I am to wrap it back up for another week or so. 

The doctor says it will take about a month to heal and I will eventually lose the nail, that is now laying on top of the injury. 

Without giving skin grafting a thought I put the nail that I cut off back on to help stop the bleeding so I could bandage it. 
Turned out to be a good idea, according to the dr.

*****

With any luck
next week I will NOT post an injury!
Really hoping this is not the way my New Year will keep going!

*****

By the way,

if you haven't already guessed,

Yes, I did make this card with my new blue thumb!

It was a little tricky here and there but I did it! 

*****

Oh about my neck injury of last week...
it's not a 100% yet but it is much better! 

*****

Have a great weekend!


Photobucket

Wednesday, January 9, 2013

You're Invited...

Hi everyone!

***
An update on my injury...
My neck is swollen and very sore but 
my arm, leg and head are good.

Just taking it easy now.

***

Today I want to show you the DT project I did for 


How cute is this Terry French Stamp?
I stamped it with barn door distress ink.


I knew when I saw the stamp that I wanted to use it for a 
tea party invite.

I cut the teacup with my Silhouette Cameo
and colored it with my Spectrum Noir markers.


The teapot wire hanger I did freehand and I love how it came out! 
I really had no plan when I started! 
LOL

I used perfect pearls in rouge along the edges of the tag.
The bling, flowery ribbon with pearl trim is all from my stash.
The flowers are from SaCrafters.
The pink satin ribbon on the top is from Really Reasonable Ribbon.

You can find the stamp I used, and many more, here 
and check out Treasured Times Facebook page as well.
Photobucket

Monday, January 7, 2013

OUCH!

Hi everyone!

My goal this year was to post more often and I started out pretty good, I think,
however.....

Yesterday, while bringing in the groceries, 
I took a spill in the garage.

Although I landed with my leg/hip, arm and head I managed to,
luckily,
have NO bruises, at least not visible,
and the lump on my head that I expected did NOT appear!

I do however believe I have whiplash.

My neck is SOOOO sore and have a bit of a headache. 

So no more posts for a little while because,
 unfortunately,
 I won't be creating anything for a while either.

I will try to pop in from time to time to your blogs but my plan right now is to relax and heal.

Happy Crafting to you all!


Photobucket

Anniversary Gift...

Good morning everyone!

As soon as I saw the collage sheets,
Between the Lines, 
over at Gecko Galz,
I knew I had to make something for my brother and his wife with this image...


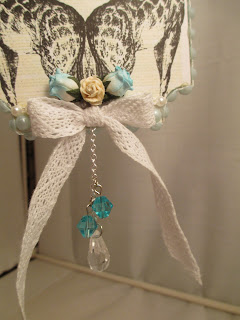
My sister-in-law loves giraffe's and this image is so cute!

I edited the image in gimp to add their names.

The blue wire is from my stash,
I twisted it into the heart shape on top then put the two ends through the two holes on the top of the ticket and simply twirled the wire on a dowel.

The flowers are from Wild Orchid Craft's.


The clear gems are from MB's Treasurista.
I add some to the flower cluster on top as well as the one I added to the chain, 
hanging from the bottom,
 along with a couple of blue gems from my stash.


The crochet ribbon is a favorite from Really Reasonable Ribbons.
 
And last but not least...

I added some blue pearl trim all around the outer edges of the chipboard ticket.
 

If it didn't have their names in there it would be hard to part with this one.
I can enjoy it until April though, 
then I will happily send it off to them!


Photobucket

Sunday, January 6, 2013

Happy Birthday

Hi everyone!

Today I want to show you the birthday card that I made for a dear friend.


I started with a blank card,
folded the top piece in half so I could make an easel card.

I placed a piece of fringe canvas from my stash to cover the fold.

Added one of January's new papers,
Letters to Juliet,
from the Star Crossed Paper collection over at Gecko Galz.

The image is from the Between the Lines collage sheets, 
also from Gecko Galz.
I wrapped a piece of ribbon from 
 around the image then topped it with a button from my stash.
I pop dotted the image onto the background paper.

I cut the tag with my Cameo, 
stamped Happy Birthday on it and inked the edges with walnut stain distress ink. 

And last...
 a little bit of bling mesh from my stash.

Happy Birthday Heather! 
Hope you have a great day!

Photobucket

Saturday, January 5, 2013

Snow lady...

Good morning everyone!

Some time a month or so ago I saw where someone took an old sweater, cut off the arm and put it on to an old lamp. 
I thought that was such a cute idea 
and
 since I have an old lamp that I don't necessarily like I decided to try it.  

I went to Goodwill, got a cable knit sweater that didn't fit any of us.


Now, I do like that!


So with one sleeve on the lamp, what do I do with the other sleeve?

Well.....

first you throw it in the corner for a couple of weeks.

Then.....

You make a snow lady!


Isn't she cute?

Aside from the buttons, nose and some thread the whole thing was done with the other sleeve.

I used suede Glimmer Mist for her hair, 
which are small strips that I stretched and hot glued under the top/hat.
I love that it looks like she has curly hair!

I used random squirts of green patina Perfect Pearls Mist and Art (or ArtO?) glitter mist in red for the scarf.

The ball on top was a thin piece of the sleeve that I cut and stretched, then rolled in a ball and hot glued it on top!

Her carrot nose, I believe, is an old wooden lollipop stick, that I had on my desk.
(I used it to curl the wire on other projects...you can see one here.)
I cut it and colored it with an orange marker.

Gotta love making a snowman/snowlady...
in the warmth of my cozy room!

Photobucket

Friday, January 4, 2013

St. Valentine's Greeting

Hi everyone!

Today I want to show you another Valentine card I've made.

With this one I got out my 
Spectrum Noir markers as well as my Distress Markers.


I started with doodling on the edges of the blank card with a distress marker 
then added some Rouge liquid pearls.

I added some worn lipstick and vintage photo distress inks to the edges of all the pieces.

The background paper is from the 
Star Crossed Paper collection at Gecko Galz. 

The rosy heart stamp is from the 
Heart and Soul digi stamps collection at Gecko Galz.
I colored the stamp with my Spectrum Noir markers.

I used pop dots to raise the heart on top of the background paper. 

The St Valentine postcard, stamp and butterfly are from the 
Bit's and Pieces collage sheet collection at Gecko Galz.

I tied a piece of sheer pink polka dot ribbon from Really Reasonable Ribbon around the postcard.


The Amour banner I cut myself and stamped with a couple of stamps in my stash,
then added a couple of I-rock gems.

***


Photobucket

Thursday, January 3, 2013

Love...

Hi everyone! 

School is back in session and the house is quiet once again.
Actually other than the tv being on all day vacation really wasn't any different from any other day, 
my daughter is usually pretty quiet.
It is nice for her to be back in school again though, 
as much as she says she hates school she is a social butterfly so being away from her friends is a bother to her.

Anyway.....

in my quiet little room today I decided to make some more Valentine cards.

However....

I kinda took a detour and ended up with this instead.....


 I had a piece of cardboard sitting on my desk from one of the Chirstmas gifts my daughter sent me so I started cutting.

Once I had the heart cut out I added paper from the 
Star Crossed Paper pkg at Gecko Galz.
I added the bingo card from the Bits & Pieces collage sheet
and 
the postcard from the Postcard Memories collage sheet
also from Gecko Galz.
I used pop dots for the postcard. 

The flowers are from Wild Orchid Crafts
and the ribbon is from Really Reasonable Ribbons.

Here is a closer look.....


I distressed the edges with a pair of scissors.
Stamped Love on a scrap piece of paper and inked the edges with walnut stain distress ink.
The bling, resin flowers, & wire are from my stash and 
lacy trim, around the outside edge of the heart, I found at Walmart.

*****

I will be linking this up to the 
Really Reasonable Ribbon challenge 

I didn't get a "new toy" this year but the ribbon from RRR is new as well as the lace trim that I found at Walmart last night!

Pin It!
Photobucket

Wednesday, January 2, 2013

To My Valentine

Good morning!

I started making my Valentine cards.

Here is my first one...


I started with Star Crossed paper, 
from the Star Crossed paper pkg at Gecko Galz.

I added an image from the Very Vintage Valentines,
 a Gecko Galz collage sheet.

The doily on top is from my stash, cut to fit the top of the card.
A crochet ribbon, tied in a bow, is from Really Reasonable Ribbon.
The heart trim on the bottom is from my stash.


Photobucket

Tuesday, January 1, 2013

Birthday Wishes

Hi everyone! 

I hope you all had a great holiday season and enjoy a 
Very Happy Healthy New Year!

This month is one of my brother's birthday so I made him this card...


I started with a blank card and topped it with,
Montegue paper from the Star Crossed Paper collection at  
Gecko Galz, that I wrapped with brown and white twine.

The stacked books image is from the Between the Lines collage sheet collection, 
also from Gecko Galz.
I inked the edges with walnut stain distress ink and
 then topped with some mica flakes that my 
BOLB (Best Online Buddy) Heather sent me.

The Birthday wishes tag was cut on my Cameo, stamped & edged with walnut stain distress ink.


Here you can see that I pop dotted the book stack paper.

Happy Birthday lil' Bro!


Photobucket