Friday, September 30, 2011

My new blog button

For a while now I had been wanting to have a blog button but apparently needed to have a little kick to get me in gear and make one.

If you read my previous post then you already may know I finally got that kick from 
post this morning.

After reading her post this morning I decided to make this little pillow and use it for my very first blog button picture.


This pillow was all hand stitched.
The flower is also hand done by me.

A close up.....


Is it wrong to be so proud of me? 
I just love this pillow!

Help yourself to my blog button, up on top of the left column!

Thanks hopping in!


Blog hopping

 Cup of tea in hand and ready to start the day.....

I checked my emails...

Then...

started a bit of blog hopping.

Love hopping through and seeing all the wonderful things everyone is doing. 
Seeing all the inspiration that everyone is so graciously willing to share with us all. 
Love looking at scrapbook pages, card making, altered art in many shapes, sizes, and forms.
Also love looking at furniture remodels and room designs/home decor.

The best is techniques and know how that bloggers share.
Love learning an artsy new technique, from making your own embellishments for your scrapbooking pages, to painting and inking techniques, sketches for pages and cards, to altering images for those pages and cards 
or
how that piece of furniture went from drab to fab!

And, WOW, the different styles everyone chose's to work with!
My personal fav's are vintage and shabby chic but it's so cool to see all the others.
There are so many!

Today my how-to info came from Cindy Adkins' Whimsical Musings.
She is doing a week long Blogging Seminar for us.


It just started today so hop over and see what she taught me today.
It was very informative and I can't wait for the rest of the weeks info.

I hope you find it as helpful as I have!

Happy Blogging!


Monday, September 26, 2011

Happy mail!

I went for a walk in the rain this morning.

I got wet.

I got cold.

I got a Recipe Mini and goodies!

We had a recipe mini swap over at Bella Creations and my Bella Friend Pam was to send to me.
Yay!

Look at this lovely Recipe Mini I got!


This is huge!

I LOVE it!

She gave me oodles of pockets to put recipes and pic in!
And loads of recipe cards with spares on the side!
There are 16, front and back, pages!

Here is a look at a couple of pages.....


It's a paper bag mini, the two recipe cards, on the bottom right pic, go into the bag pocket.

I am going to have so much fun adding recipes in here. 
And speaking  of recipes she sent me some of her fav's!
They look pretty yummy too!

Here is another look at the mini with a peek at some of the goodies she sent as well.....


She sent me flowers, tags and paper galore!

She spoils me! 

THANK YOU PAM!!!


Alcohol ink transformation

In the process of clearing out his office at work, of all the junk from the previous managers/proprietors, my hub's told me that I could take any piece of office supplies that I wanted!

Right away I spotted 2 of these...


Oh yea! 
12 inches I'm grabbing them!

Pretty ugly though!

Got out my trusty Alcohol inks and .....


I went with Earthtones - Slate, Bottle & Meadow and Brights - Citrus.
 
So much prettier but.....
 

A little swirly stamping done with black StazOn and I'm liking it even more!


I am off to attack #2.

What do you have hanging around that would love to be kissed with some alcohol ink or stamps?


Sunday, September 25, 2011

Rendezvous Days

Going with a little different blog today. 
I don't usually share pic's of my days but I thought I'd try something new today. 

I read Cindy Adkins books 
and 
Blog from the Heart: A Woman’s Guide to Blogging
and a few things that I read made me think I should venture outside of my box and share my day away from my scrap room once in a while. 

Since I had a wonderful day with my daughter yesterday I though it would be a good day to share.

We went to Fort Atkinson Rendezvous Days. 
A kind of fair with crafts and food but also a history lesson of days gone by as well.
They show what life was like in the 1840's with period costumes and a recreation of the time period with regard to the military life at the fort as well as the hunters, trappers, and traders. 
Here are a few of the pic's that my daughter took...

The tents they lived in way back when as well as this weekend. 
Looks like fun to me, they brought their beds with them, comfy cozy!
And lot's of furs to keep them warm.

How cool would it be to cook over the fire like that?

Don't know what they were shooting at but it didn't stand a chance. 


My daughter took a pic of me in front of this last building but between the coat I was wearing and the way I was standing I looked VERY pregnant, sooo NOT! 

I didn't see this one. 
Kind of and odd shape to this tent don't you think?
It's almost a teepee.

Lookie what this gentleman made and I took home.
Isn't he cute?

 This was a little show they were putting on.

Oh, I mentioned food up there so can't forget to show you...
my fried dough taco, YUM, and my daughters hot cocoa. 
Is it just me or does that look like a ghostly shadow of a fork? 

And this is my darling daughter with her new puppy that we picked up at the fair. 
Actually it was outside of the fort and down the hill. 
A couple was sitting in a pen with 3 little ones they were giving away for free and my daughter couldn't walk away without one. 
His mother is Collie/Rottweiler mix and his dad is a lab or lab mix, they were unsure. 
His name is Bear and he is such a cutie. 
Very clingy right now and unsure of the two dogs we already have here at home.
He is slowly getting used to his new environment though. 

Thanks for stopping by.
Sorry if this was a bit long for you and pic heavy but I hope you enjoyed. 
 
Not sure what is up with the font here. 
Looking at the preview it seems to be choosing it's own size.
 
Back to my scrap room!
 

Thursday, September 22, 2011

Shabby card

I don't know how I did it but amongst all my running around today I managed to make this card...


I used a few different stamps on this, using vintage photo, wild honey, faded jeans and black soot distress inks.

I made the flower.


I'm linking this up to the
Shabby Chic Girls Club.


Wednesday, September 21, 2011

Happy Birthday

Brothers #1 & #2 have birthdays pretty close together so here are the cards I made for them today...


Brother #1 will get this one...
 

I used Vintage photo and black soot distress inks on the background

The jalopy was done with a black heat embossing.
Here's a close up...


Brother #2's card...


I stamped the background with a leaf stamp in vintage photo distress ink then added wild honey, rusty hinge & fired brick.
The card itself got tea dye, vintage photo and edged with black soot distress inks.
The jalopy was done the same as the first one with the black embossing powder. 
I also added a little bit of vintage photo to tone down the whiteness of the paper I stamped on. 

I also got out my Irock to add a little "masculine" bling.

A close up...


I love that the layer of black heat embossing gave it a little bit of a hammered look.

Thanks for stopping by. 


Monday, September 19, 2011

Totes...

I have two of them to share today.

challenged us to do something a little bit different this month. 

Heather, at her group 
Debut des Techniques Graphique,
wanted us to grab 4 images and run over to GIMP to do a little editing. 
Then we were to take the GIMPed out image and print it or iron it on to a tote, pillow case, backpack, t-shirt or some sort of fabric.
Embellish as we like with buttons, lace, flowers, etc...

This is my tote...

I used a frame from Gecko Galz,
the roses and bird are from Graphics Fairy
and a photo of my Grands
(that was taken by my 13yr old daughter).

I also used the Pour Vous texture I got a while ago from 
I did a lot of hand sewing on this. 
Sewing machine broke and I decided to add lace all around the tote!
LOL
I added a bit of Perfect Pearl mist and Heritage Gold mist, both mixed by me.
A few buttons and there you have tote #1.

I linked this up to Brag Monday at Graphics Fairy
and
Pamela Joy - The Girls Club.
___
Shawn's challenge, 
at the Viola Ink Group, was titled 
No Paper Stamping.
You may have seen a recent post where I stamped on tiles. 
That was fun!

But...

since I have extra totes here, 
they came in a 3 pkg.
Why not do a little stamping on one of them too?


I may have gone a little crazy with the use of distress inks on this one.
A little wild honey, fired brick, rusty hinge, peeled paint, faded jeans and a touch of vintage photo. 

Before I did the inking I sprayed walnut ink all over it.

I used StazOn in black for the swirl stamping.


I added bling with my Irock.

And there you have tote #2.

Not sure what I will do with tote #3 but right now it is sitting in a tea bath. 

Thanks for stopping by...


Thursday, September 15, 2011

I give up!


 Having one of those days!

You know the ones!

Everything that can go wrong.....

I should have went back to bed this morning when I spilled my first cup of tea, but nope, I kept going...

The scones came out good but the watermelon was bad. 
Out of season watermelon, don't know what I was expecting.

Spilled another cup of tea...

Stuck my finger in the glossy accents that I just put on a piece of tile. 

Fixed it, 
then blindly put a piece of cardstock right on top of it. 

Didn't see that until tooooooo late!

In an attempt to pick that up and check it out, 
put my finger in another one.

Ruined that one too!

Some how I did manage to make this though...


I am thinking I should spend the rest of the day relaxing.
A warm bowl of soup
Feet up
Maybe I'll read a book! 


Monday, September 12, 2011

A mannequin finds a new home...

If you saw my last post then the mannequin on this one might look a little familiar.

I did this layout of my Aunt to enter into the 
Bella Muse 
and 
the Tres Chic Challenges over at 

Actually I thought I was doing one challenge but realized when I went to post it that I had combined them! 
LOL

We needed to use one or both of the two images that Lacee gave us for the Bella Muse challenge.

I used both.

The Tres Chic challenge, titled Sew-riffic, required some sewing (machine or hand) and we had to add pearls, fabric and a flower.

This is what I came up with...
I added pearls to the neck of the one mannequin and a rose to the neck of the other.

Here is a close up of the images Lacee gave us...
She gave us the two on the left.

The Ironclad and the dressform images came from Sandi over at the 
over at Bella Creations. 
This is a new group where Sandi is posting images from her private stash for us to use.
You have to be a member of the group to get these images so what are you waiting for? 
She will be posting several images a month then changing them out for different images for the next month. 
So hurry or you'll miss out on this months offering!
Once they're gone, they're gone!


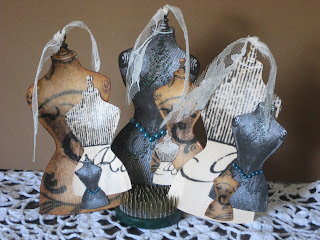
Mannequins

Keeping my mojo going over at Bella Creations
Helene offered us these mannequins, from 
and asked us to make a set of whatever we chose(tag, ATC, or bookmark) using all three.

I chose tags.

I printed them out in three different sizes.

On the cream colored mannequins I used Clear Rock Candy Distress Crackle paint.
On the tea stained/tan mannequins I used clear embossing powder.
The black mannequins I added some glitter glue in a couple of places and pearls on their waist.

Then I put them together...
a close up...

While I was having fun with these mannequins I also decided to get out the shrink paper 
and made...
my new key chain!